Sewing has always been this thing in the background for me, that my Mom and Aunt always did, I always wanted to try but thought was completely out of my skill set and patience level! However, as soon as started my Ph.D. and started getting a stipend, sewing machine was one of the first things I purchased, along with camera Olympus c-725 in 2004!
As soon I got my sewing machine, I did a few projects the following year, but soon gave up as it was a big hassle getting the machine out of the box every time and putting away every time. And when I moved in to the Hackfeld house in 2007, it just stayed in the box for the next 5 years, until I recently took it out to make a birthday present for my niece.
But now that it was out, I did not want to put it back, and just in time, I saw an ad for a free sewing machine cabinet/table on Craig's list. The ad said that it has been sitting outside in the rain and needs to be refinished, and the picture looked liked one of the drawers might be falling off. However, the idea of a separate table for the sewing machine sounded really good and I decided to get it against my friend Tess's advice.
Then, I had to drive around with the cabinet in my car till Tess had time to help me get it out as J is back in SJ!
The day I got it out of the car, the rain had stopped for a short time and some bumble bees that had taken shelter in the cabinet were now swarming my car!!! Actually, there were only 3 and it was not so bad once they were out of my car.
 As it turns out, the broken drawer, was actually not a drawer at all, but a door and the hinges need to be fixed.. not too bad. And the rest of the drawers, though not modern, are pretty smooth. Additionaly there is a compartment on top, that is supposed to hold the sewing machine while you sew so that the sewing surface is at the same level as the table top, and when you are done, you put the machine away in the little area behind the door!
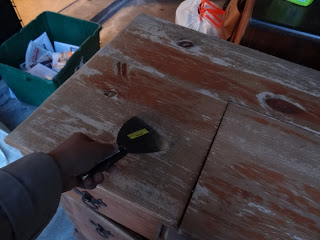
 So far I have scraped away the peeling poly from the surface with a scraper and its waiting for more work!
 May 20, 2011
The scraping was not enough, so I took the hand sander given to me by the "Wood Chuck and Wood Chick" and I sanded this baby down for hours!!!
4 hours (ofcourse with breaks) and five 120 grid hook-and-loop sand paper sheets later, this is what I have.
 I filled smaller dings with wood-putty, but I have to still figure out what to do about the huge gaps in the bottom moldings. I have tried hammering it in, but nails on some of the have come loose and I think some of them are even warped, so that if I hammer it in on one side, it comes out on the other.
As soon I got my sewing machine, I did a few projects the following year, but soon gave up as it was a big hassle getting the machine out of the box every time and putting away every time. And when I moved in to the Hackfeld house in 2007, it just stayed in the box for the next 5 years, until I recently took it out to make a birthday present for my niece.
But now that it was out, I did not want to put it back, and just in time, I saw an ad for a free sewing machine cabinet/table on Craig's list. The ad said that it has been sitting outside in the rain and needs to be refinished, and the picture looked liked one of the drawers might be falling off. However, the idea of a separate table for the sewing machine sounded really good and I decided to get it against my friend Tess's advice.
Then, I had to drive around with the cabinet in my car till Tess had time to help me get it out as J is back in SJ!
The day I got it out of the car, the rain had stopped for a short time and some bumble bees that had taken shelter in the cabinet were now swarming my car!!! Actually, there were only 3 and it was not so bad once they were out of my car.


The scraping was not enough, so I took the hand sander given to me by the "Wood Chuck and Wood Chick" and I sanded this baby down for hours!!!
4 hours (ofcourse with breaks) and five 120 grid hook-and-loop sand paper sheets later, this is what I have.


------Update-------
Finally, J was here after a long time! With his India trip and a short last visit, we had not had time for any projects together in almost two months. But this time he was here for almost 10 days, and we were able to get on with this project.

This is after staining with water based stain. I will try to take a better picture later. But here it is for now. I am also planning to stencil a sewing proverb and a picture of sewing basics on top. Can't decide if I should go with silver for contrast, or gold as the hardware is bronze..
No comments:
Post a Comment